
| Constructor | Description |
|---|---|
| public GridLayout() | Creates a GridLayout with single column to hold the components. |
| public GridLayout(int rows, int columns) | Creates a GridLayout with a specified number of rows and columns to hold the components. |
| public GridLayout(int rows, int columns, int horizontalSpace, int verticalSpace) | Creates a GridLayout with a specified number of rows and columns to hold the components and also lets you specify the horizontal and vertical space between the components. |
| Methods | Description |
|---|---|
| public void add(Component comp) | This method adds the component, comp, to the container |
| public void setLayout(LayoutManager object) | This method sets the layout of the components in a container. |
| public void setHgap(int horizontalGap) | This method sets the horizontal space betwen components. |
| public void setVgap(int verticalGap) | This method sets the vertical space betwen components. |
import javax.swing.*;
import java.awt.*;
import java.awt.event.*;

public class GridLayoutEx
{
public static void main(String... ar)
{
SwingUtilities.invokeLater(new Runnable() {
public void run()
{
new A();
}
});

}//Closing the main method
}//Closing the class A


class A
{
JFrame jf;


A()
{
jf = new JFrame("GridLayout Example");

JButton button1 = new JButton("1");
JButton button2 = new JButton("2");
JButton button3 = new JButton("3");
JButton button4 = new JButton("x");

JButton button5 = new JButton("4");
JButton button6 = new JButton("5");
JButton button7 = new JButton("6");
JButton button8 = new JButton("-");

JButton button9 = new JButton("7");
JButton button10 = new JButton("8");
JButton button11 = new JButton("9");
JButton button12 = new JButton("+");


JButton button13 = new JButton("0");
JButton button14 = new JButton(".");
JButton button15 = new JButton("=");
JButton button16 = new JButton("Result");


//Setting the layout of the components in container, JFrame, to GridLayout
jf.setLayout(new GridLayout(4,4)); //GridLayout constructor is called with 4 number of rows
				   //and 4 number of columns, to hold 16 buttons

jf.add(button1);
jf.add(button2);
jf.add(button3);
jf.add(button4);

jf.add(button5);
jf.add(button6);
jf.add(button7);
jf.add(button8);

jf.add(button9);
jf.add(button10);
jf.add(button11);
jf.add(button12);

jf.add(button13);
jf.add(button14);
jf.add(button15);
jf.add(button16);


jf.setSize(300,200);
jf.setVisible(true);
}

}
When you run the code, you are presented a window that contains all the 16 buttons, positioned across the 4 rows and 4 columns, using GridLayout manager.
As you may see in the figure1, the window resembles a mini calculator.
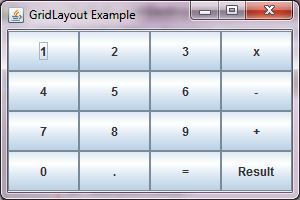 Figure 1


Coming Next
-
JSP & Servlets
© Copyright 2017 Decodejava.com. All Rights Reserved.