In this article, we are going to understand attributes associated with the current request made by the user. A request attribute is
an object added to the request scope on the server side used for the request processing.
We can set and get the value of attributes associated with the request by using the methods of
ServletRequest object.
After setting some attributes with the current request, we can even pass this request from one to another Servlet in order to have a shared request processing by multiple Servlets.
Methods of ServletRequest to set, get and remove request attributes
Method
Description
ObjectgetAttribute(String str)
This method gets an individual request attributes.
EnumerationgetAttributesNames()
This method gets all the named of request attributes.
voidsetAttribute(String name, Object value)
This method sets the request attributes.
voidremoveAttribute(String name)
This method sets the request attributes.
A Request Attribute Example
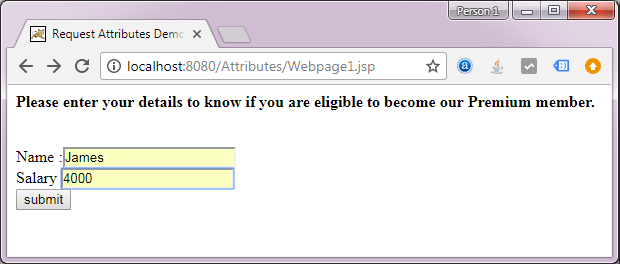
We are creating a webpage which asks the user to submit the details to check whether the user is eligible to get a premium facility or not, based on a condition -
A user must have a monthly salary of more than 5000$
after filling the details when submit button is clicked, the request is are dispatched or forwarded to the Servlet named FirstServlet (mentioned in the deployment descriptor file(web.xml).
Webpage1.jsp
<html>

<head>
<title>  Request Attributes Demo </title>
</head>


<body>
<b>Please enter your details to know if you are eligible to become our Premium member</b>
<br/>
<br/>
<br/>

<form action = "FirstServlet">
Name :<input type = "text"  name = "username"/>
<br/>

Salary <input type = "text"  name = "income"/>
<br/>

<input type = "submit" value = "submit" />
</form>

</body>
</html>
Creating a Servlet to set request attributes
We are creating a Servlet extending GenericServlet abstract class.
GenericServlet class implementsServlet and ServletConfig interface, hence
we can directly call the methods of ServletConfig within this Servlet.
In this Servlet class named MyServlet1.java, we have implemented the service(ServletRequest req, ServletResponse res)
of GenericServlet. Within the service() method, by using the object of ServletRequest we have created two request attributes named
Name and Salary and have set them in the current request using the method setAttribute() method of ServletRequest.
Next, by using the request object we have called its method getRequestDispatcher(String path) method to create an object of RequestDispatcher.
If the Salary of the user is less than 5000, then by using the object of RequestDispatcher, we are going to call its method
forward(ServletRequest req, ServletResponse res) to forward the current request and its attributes from the current Servlet
named FirstServlet to another Servlet named SecondServlet, as mentioned in the deployment descriptor file(web.xml)
If the Salary of the user is greater than 5000,
then by using the object of RequestDispatcher, we are going to call its method forward(ServletRequest req, ServletResponse res)
to forward the current request and its attributes from the current Servlet named FirstServlet to another Servlet named ThirdServlet, as mentioned in the deployment descriptor file(web.xml)
MyServlet1.java
import java.io.*;
import javax.servlet.*;
import javax.servlet.http.*;
import java.util.*;


public class MyServlet1 extends GenericServlet
{


public void service(ServletRequest request, ServletResponse response) throws ServletException, IOException
{

//Setting Request Attributes to be shared between multiple servlets
request.setAttribute("Name", request.getParameter("username"));
request.setAttribute("Salary", request.getParameter("income"));

if(new Integer(request.getParameter("income")) <5000)
{
RequestDispatcher reqDispatch = request.getRequestDispatcher("SecondServlet");
reqDispatch.forward(request,response);
}
else
{
RequestDispatcher reqDispatch = request.getRequestDispatcher("ThirdServlet");
reqDispatch.forward(request,response);
}


}
}
MyServlet2.java
import java.io.*;
import javax.servlet.*;

public class MyServlet2 extends GenericServlet
{

public void service(ServletRequest request, ServletResponse response) throws ServletException, IOException
{
response.setContentType("text/html");
PrintWriter out = response.getWriter();

out.println("" + "Hello " + request.getAttribute("Name") + "");
out.println("
");
out.println("Sorry, you are not eligible to become a premium member.");

}
}
MyServlet3.java
import java.io.*;
import javax.servlet.*;

public class MyServlet2 extends GenericServlet
{

public void service(ServletRequest request, ServletResponse response) throws ServletException, IOException
{
response.setContentType("text/html");
PrintWriter out = response.getWriter();

out.println("" + "Hello " + request.getAttribute("Name") + "");
out.println("
");
out.println("Congratulations, you are eligible to become a premium member.");

}
}
Advertisement
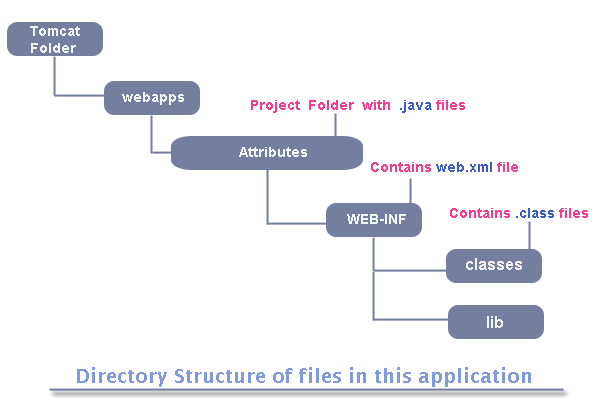
Directory Structure of Servlet files
The diagram above depicts how to arrange the Servlet files in a specific directory structure, as per Java Servlet Specification-
Project Folder - We have created a project folder named Attributes within
the webapps folder of Tomcat installation folder. This folder contains the Servlet class(.java) file and WEB-INF folder.
WEB-INF - Within your project folder, you create another folder named WEB-INF and this folder should contain the deployment descriptor file(web.xml) of your Java Servlet program.
classes - Within the WEB-INF folder you should create a folder named classes. This folder should contain the compiled(.class) form of your Java Servlet class.
Creating the Deployment Descriptor file
As per the Java Servlet specifications, every web application based on Servlet must have a Deployment Descriptor file(an XML file) named web.xml.
So, let's create one -
In deployment descriptor file, <servlet> has two child tags <servlet-name> and <servlet-class> :
<servlet-name> tag is used to specify a unique name for our Servlet class.
<servlet-class> tag is used to specify the full qualified name of the Servlet class .
Note
The child tag <servlet-name> of <servlet> tag is matched with the <servlet-name> child tag of
<servlet-mapping>. The
<url-pattern> child tag is used to specify the URL to access Servlet, Hence -
We have named this URL FirstServlet. to access the first servlet, MyServlet1.java
We have named this URL SecondServlet to access the second servlet, MyServlet2.java.
We have named this URL ThirdServlet to access the third servlet, MyServlet3.java.
Setting the classpath
Much of the support for developing the web applications based on the Java Servlet technology does not come with the core Java.
Hence, in order to compile the Servlet programs, we have to set the classpath to a jar file named
servlet-api.jar.
This jar file provides all the classes that are required for the Servlet programming and it comes within the lib Folder of
Tomcat installation folder.
For example, in our case we have installed Tomcat Web Server within the C: Drive, hence the path to our lib folder containing the servlet-api.jar is - C:\apache-tomcat-9.0.2\lib
There are two ways to set the classpath -
You could set the classpath by entering this command at the Command Prompt, but this only temporarily sets the classpath to the path of servlet-api.jar file. If you restart your system, you will have to set the classpath again.
set classpath=C:\apache-tomcat-9.0.2\lib\servlet-api.jar
In order to set the classpath permanently, you need to set your classpath system variables. A simple tutorial on how to permanently set the classpath system variables, you may read
How to permanently set the classpath system variable
Compiling the Servlet class
After setting the classpath, you need to compile the both of the Servlet class by entering the command at the folder where you've stored the Servlet class file.
javac -d WEB-INF/classes MyServlet1.java
javac -d WEB-INF/classes MyServlet2.java
javac -d WEB-INF/classes MyServlet3.java
Executing the Servlet
First we execute the webpage containing the form, asking the user to and press the submit button, if he/she wants to forward
the current request from the first servlet to
the second servlet. Although this webpage calls the first servlet but this first Servlet immediately calls the second servlet due to a call to
RequestDispatcher's forward() method.
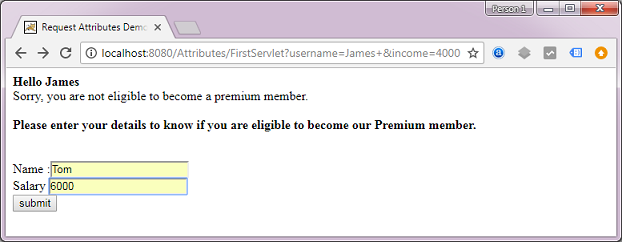
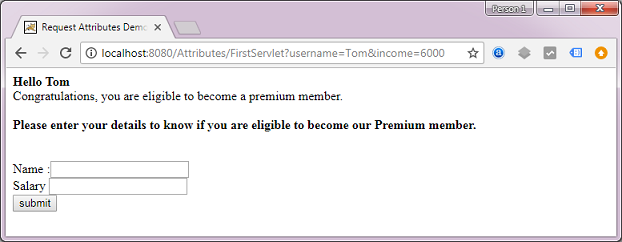
As soon as the user submits the form, the request goes to the Servlet named FirstServlet which checks if you are eligible
to become Premium member or not.
If you are not eligible, then the current request and its attribute is forwarded using forward() method to the second servlet named SecondServlet and an appropriate
message is shown and it also includes the form webpage by calling include() method of RequestDispatcher
if you are eligible, then the current request and its attributes are forwarded to the third servlet named ThirdServlet,
and an appropriate congratulatory message which also includes the form webpage by calling include() method of RequestDispatcher.