![]()
![]()
Advertisement
| Constructor | Description |
|---|---|
| public GridBagLayout() | Creates a GridBagLayout manager. |
| GridBagLayout Constraints | Description |
|---|---|
| int anchor | Specifies the location of a component within a cell. Some of the values it can take - GridBagConstraints.CENTER GridBagConstraints.WEST GridBagConstraints.EAST GridBagConstraints.SOUTH GridBagConstraints.NORTH |
| int gridx | Specifies the X-Coordinate to which a component will be added. |
| int gridy | Specifies the Y-Coordinate to which a component will be added |
| int ipadx | Specifies the extra horizontal space around the component. |
| int ipady | Specifies the extra vertical space around the component. |
| int gridheight | Specifies the height of the component. |
| int gridwidth | Specifies the width of the component. It can take values :
GridBagConstraints.RELATIVE GridBagConstraints.REMAINDER |
| int fill | Specifies how a component is resized, if it is small the size of cell. It can take values of -
GridBagConstraints.NONE GridBagConstraints.HORIZONTAL GridBagConstraints.VERTICAL GridBagConstraints.BOTH |
| Methods | Description |
|---|---|
| public void setConstraints(Component comp, GridBagConstraints cons) | This method sets the constraints cons to a Component, comp |
| public GridBagConstraints getConstraints(Component comp) | This method gets the constraints applied to a Component, comp |
Advertisement
import javax.swing.*;
import java.awt.*;


class GridBagLayoutEx implements Runnable
{
public static void main(String... ar)
{
SwingUtilities.invokeLater(new SwingEx());
}

public void run()
{
new A();
}
}


class A
{
JFrame jf;
JPanel jpp;
GridBagLayout grid;
GridBagConstraints constraints;

A()
{
jpp = new JPanel();
grid = new GridBagLayout();
constraints = new GridBagConstraints();

jf = new JFrame("GridBagLayout Example");


JButton button1 = new JButton("Button1");
JButton button2 = new JButton("Button2");
JButton button3 = new JButton("Button3");
JButton button4 = new JButton("Button4");
JButton button5 = new JButton("Button5");
JButton button6 = new JButton("Button6");

//Setting the positioning of the components in JFrame to GridBagLayout
jf.setLayout(grid);

//Padding with horizontal space of 100 pixels around the next added components
constraints.ipadx=100;

//Adding the button1 to 0th x-coordinate of 0th column, at WEST
constraints.gridx=0;
constraints.gridy=0;
constraints.anchor =GridBagConstraints.WEST;
grid.setConstraints(button1,constraints);


//Adding the button2 to 1st x-coordinate of 0th column, at EAST
constraints.gridx=1;
constraints.gridy=0;
constraints.anchor =GridBagConstraints.EAST;
constraints.gridwidth = GridBagConstraints.REMAINDER;
grid.setConstraints(button2, constraints);

//Padding with vertical space of 50 pixels around the next added buttons
constraints.ipady=50;


//Adding button3 to 0th x-coordinate of 1st column, at CENTER
constraints.gridx=0;
constraints.gridy=1;
constraints.anchor =GridBagConstraints.CENTER;
constraints.fill= GridBagConstraints.HORIZONTAL;
grid.setConstraints(button3,constraints);


//Adding button5 to 0th x-coordinate of 2nd column, at WEST
constraints.gridx=0;
constraints.gridy=2;
constraints.fill= GridBagConstraints.NONE;
constraints.anchor =GridBagConstraints.WEST;
grid.setConstraints(button4,constraints);


//Adding button6 to 1st x-coordinate of 2nd column, at CENTER
constraints.gridx=1;
constraints.gridy=2;
constraints.anchor =GridBagConstraints.CENTER;
constraints.gridwidth = GridBagConstraints.RELATIVE;
grid.setConstraints(button5,constraints);


//Adding button7 to 2nd x-coordinate of 2nd column, at EAST
constraints.gridx=2;
constraints.gridy=2;
constraints.anchor =GridBagConstraints.EAST;
constraints.gridwidth = GridBagConstraints.REMAINDER;
grid.setConstraints(button6,constraints);


jf.add(button1);
jf.add(button2);
jf.add(button3);
jf.add(button4);
jf.add(button5);
jf.add(button6);


jf.setVisible(true);
jf.setSize(600,300);
}
}
When you run the code, you are presented a window(please refer Figure1) showing a JFrame containing 6 JButtons with different sizes distributed in 3 rows, where-
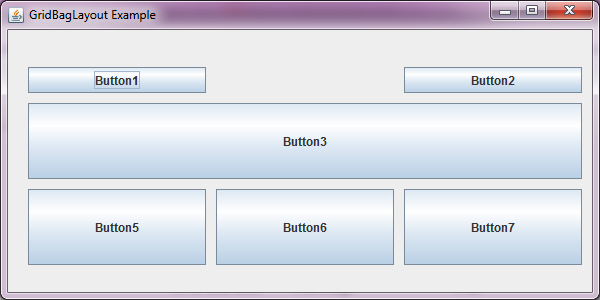 Figure 1.


Advertisement
Please subscribe to our social media channels for daily updates.
Advertisement
Please check our latest addition
C#, PYTHON and DJANGO
Advertisement
© Copyright 2020 Decodejava.com. All Rights Reserved.